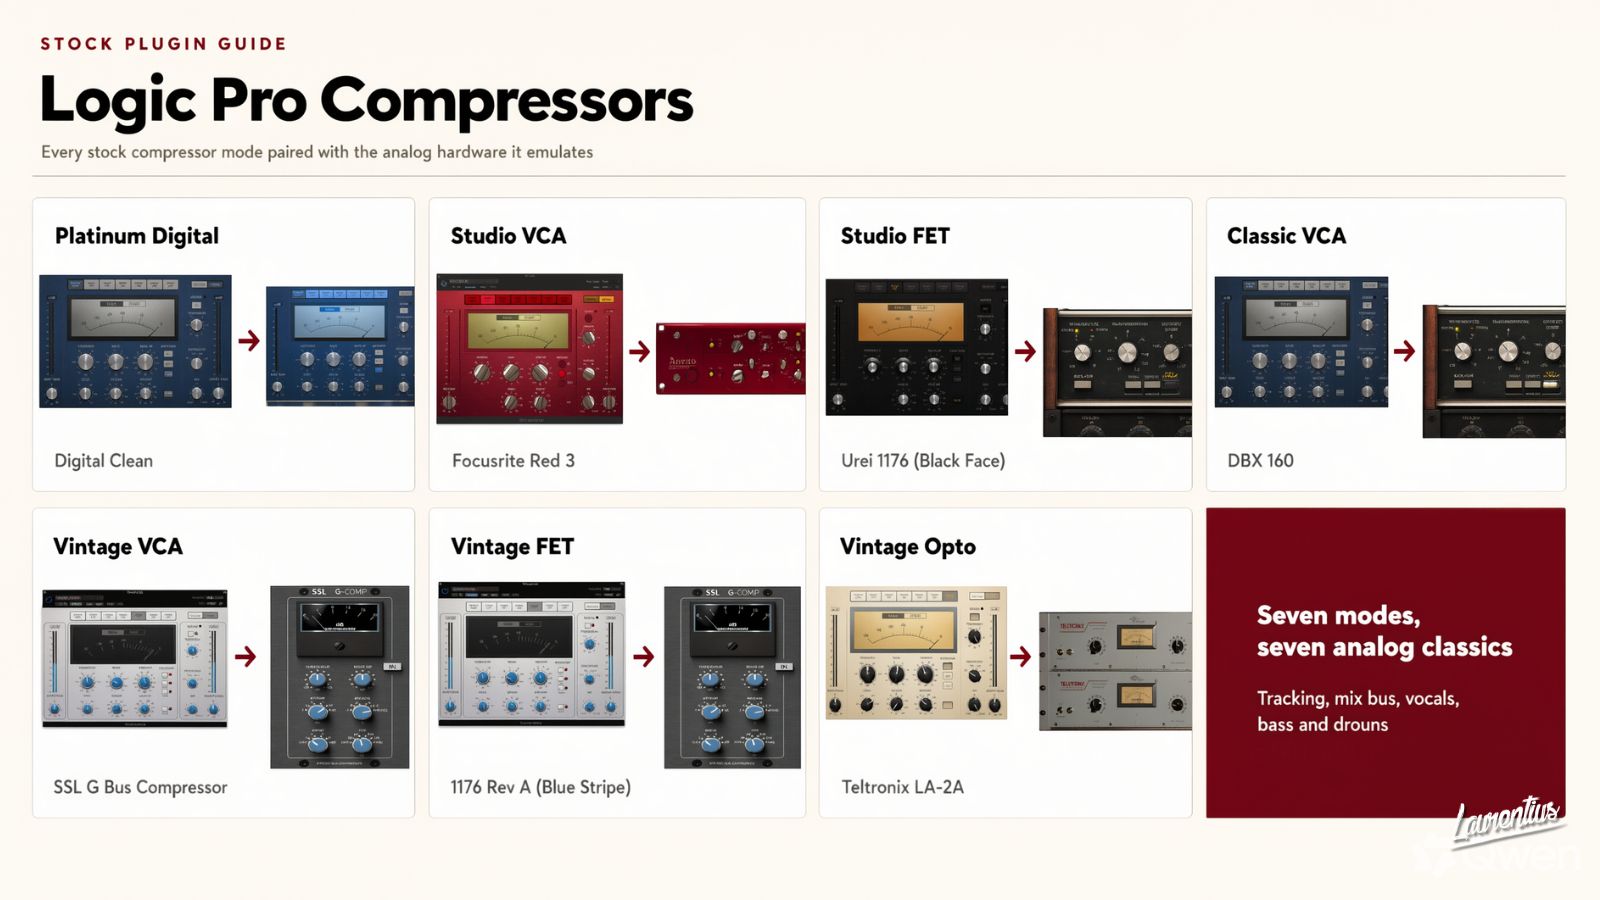
Did you know: Logic's stock Compressor has seven compressors modes in one plugin. It has FET, VCA and Opto circuit models covering most of the classic hardware that third-party developers sell as separate plugins, plus parallel mix modes, distortion and a built-in limiter. Learn these seven modes and you can save your money before buying anything else.
Like most producers, I used to open Logic's Compressor, tweak the threshold and ratio knobs a little, and leave it at that. Then, spend money on a third-party plugin that does the exact same job with a fancier design. But unknowingly, I was spending hundreds of euros on features I already owned..
Contents
- The seven compressor modes
- On vocals
- On drums
- On guitars
- On the mix bus
- The controls that make it competitive
- When to actually buy a third-party compressor
- Frequently asked questions
- Where this goes next
The seven compressor modes
Apple (Logic Pro) categorises their Stock Compressor by 'circuit family' rather than by actual hardware name.
In Apple's own words, FET compressors are known for their fast transient responses, deliver clean or warmer tone (notably in the midrange), can be pushed toward a 'crunchy' tone on transients, are ideal for drums, vocals, guitars, and only attenuate a sound.
Alternatively, VCA compressors can respond both slowly or quickly to incoming transients, have a clean tone, are therefore popular compressors for bass guitars and low-frequency signals, and can attenuate or amplify a signal.
Optical compressors are known for their fast transient response and non-linear release, are very clean, are standard compressors on vocals and guitars, and are often used as limiting amplifiers on busses or outputs.
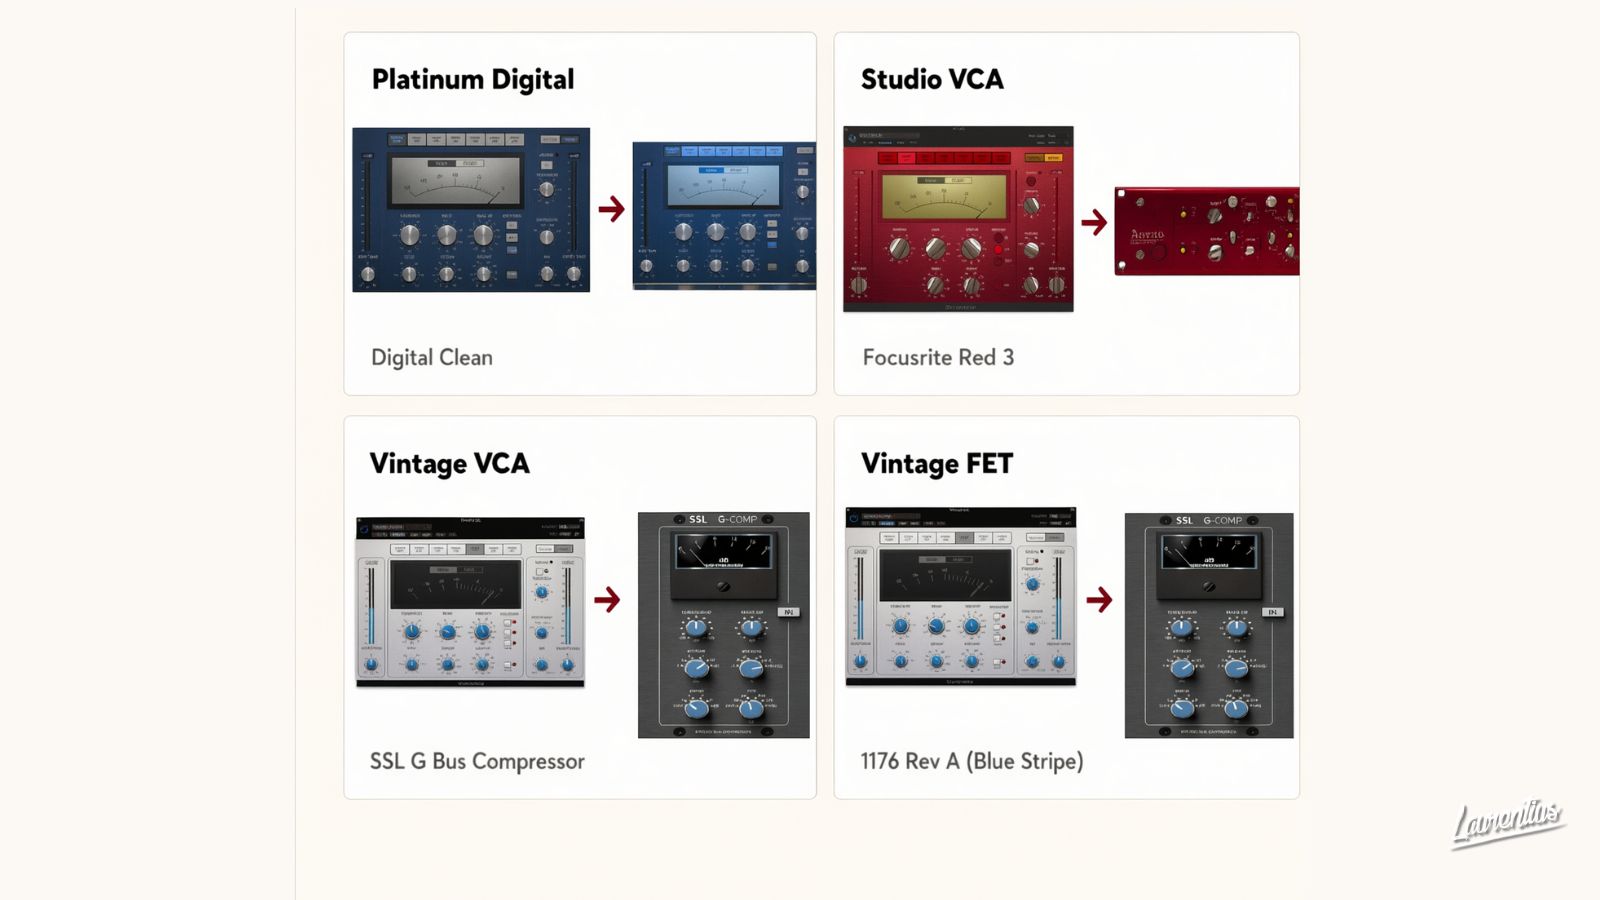
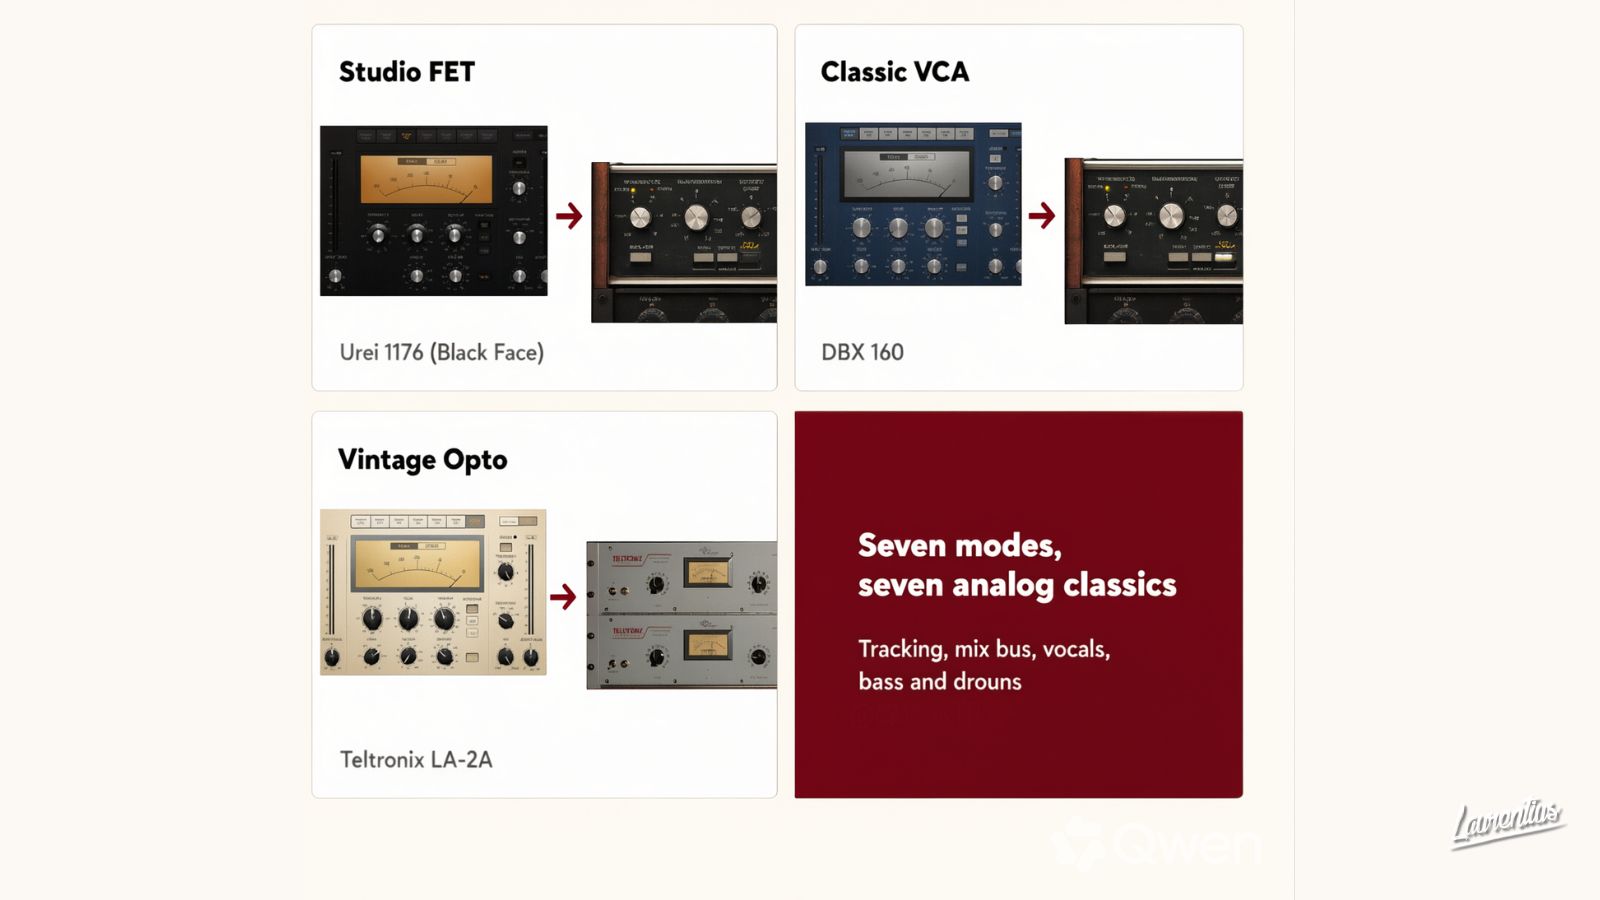
The specific hardware each model is understood to be based on is not stated by Apple, but the attributions below are the ones proven and well-reported, including We Rave You in their breakdown of these compressor emulations.
You can use this table as your secret cheat sheet for the stock Logic Pro Compressor:
| Mode | original compressor | Character (Sound) | Best used on |
|---|---|---|---|
| Platinum Digital | No hardware, Apple's own build | Clean, fast transient response | Any source where you need control and no colour |
| Studio VCA | Focusrite Red 3 | Fast and tight, natural even when pushed | Bass, mix bus, anything that needs to stay clean |
| Studio FET | UREI 1176 Rev E (Blackface) | Brightness and presence, very fast | Vocals, snare, room mics |
| Classic VCA | dbx 160 | Aggressive punch, vintage character | Drums, synth bass, guitars |
| Vintage VCA | SSL G bus compressor | Glue, plus punch | Drum bus, mix bus, glue compression |
| Vintage FET | UREI 1176 Rev H (Silverface) | Fast, with more analogue tone than Studio FET | Vocals and drums that need beefier attitude |
| Vintage Opto | Teletronix LA-2A | Slow, smooth, program dependent | Vocals, bass, guitars, anything for gentle levelling |
As you can see, this sheet covers two 1176 compressor modes, an LA-2A, a dbx 160, an SSL bus compressor and a Red 3. If you own Logic, that means you own these already. But most producers still unknowingly buy at least three of them somewhere else..
On vocals
The professional compressor approach on vocals is using two compressors, doing different jobs. You can do this with Logic Stock Compressor with these two modes.
First modes: Vintage Opto. This is used as the 'vocal leveller' or 'vocal rider'. Set your ratio around 3:1, attack slow enough to let consonants through (around 10ms to 15ms), and your release around 100ms to 200ms. Bring the threshold down until you hit 2 to 4 dB of gain reduction on the loudest sections of your vocal and no reduction on the quiet parts. The Opto model's non-linear release is what makes this sound invisible.
Second mode: Studio FET or Vintage FET. This compressor serves for the character and peak control. Set your ratio to 4:1, fastest attack you can use before the front of words disappears (100ms to 200ms), and set a fast release around 30ms to 50ms. Your threshold should aim for another 2 to 3 dB of gain reduction on the loudest sections. Studio FET is used for a brighter modern pop vocal, while Vintage FET is used when you want a more vintage-coloured sound.
My parallel trick: Set your Mix control on your second mode to around 70 to 80 percent. This serves as parallel compression inside one single plugin, and it keeps the natural dynamics of the singer's performance, underneath a controlled version.
On drums
For individual drums, choose Classic VCA. The dbx-style model is the aggressive one. On a snare, set fast attack (1ms to 3ms) and fast release (50ms to 100ms) with 3 to 6 dB of reduction gives you that 'crack'. On a kick, slow the attack to 10 to 30 ms so the transient gets through before the compressor closes, otherwise you flatten your kick too much.
On a drum bus, always pick Vintage VCA. A SSL-style compressor is what glues sounds together, therefore famously called the 'glue-compressor'. Set your ratio to 4:1, attack 10 to 30 ms, release set to auto, and aim for about 2 to 4 dB of reduction. Then set Mix to 50 to 60 percent and your drums will sit nicely together without losing their impact.
My tip for House producers: when compressing a drums bus, side-chain your compressor's detector with a high-pass filter so the kick stops driving the gain reduction. Logic Stock Compressor has a side chain section with its own filters. Set a high-pass around 100 to 150 Hz on the detector and the compressor starts responding to the whole kit rather than to the kick alone. That single change makes a house drums bus stop pumping on every quarter note.
On guitars
Apple states that both FET and Opto are well-suited to guitars, but they do different things, and it's important to know the difference between these modes.
To compress acoustic guitars, pick Vintage Opto. Set a ratio of 2:1 to 3:1, use a slow attack (15ms to 30ms) with a long release (150ms to 300ms), and aim for 2 to 3 dB reduction. This evens out strumming dynamics without killing the pick's attack. If a strummed section is jumping in and out of your mix, this is how you fix it.
When compressing electric guitars, choose Classic VCA. Set a ratio of 4:1, set it to a medium attack (5ms to 15ms), with a medium release (50ms to 100ms), with -3 dB to -5 dB. This tightens, for instance, palm mutes and makes a doubled rhythm part sit in one place.
For funk or single-note recordings, a Studio FET also works. Set a fast attack of 1ms to 3ms, with a fast release around 20ms to 50ms, a gain reduction of -4 dB to -8 dB and use Mix at around 60 percent so the transient bite still survives.
On your mix bus
Try out a Vintage VCA, and almost nothing else. Set your ratio to 2:1, tweak your attack around 30 ms, set release to auto, and adjust the threshold until you see 1 to 2 dB of gain reduction at the loudest section. Never more than this. Then check everything with a bypass test. Turn the compressor off, and back on, several times. If your mix collapses without the compressor, it's holding your mix together instead of your arrangement doing it, and that problem needs to be fixed upstream.
When working a mix bus, it's important to turn Auto Gain off on your mix bus compressor. This setting makes the compressed version louder, and louder always sounds better, which almost surely will result in making wrong mixing decision. Match the level manually with the output gain and then judge what the compressor adds to your mix.
If you are running correction software such as Sonarworks SoundID Reference on your mix bus, it should always be the last plugin in your mixing chain and it must be bypassed before you bounce or export your mix. Correction software is for your room or headphones, not for your final mix.
The controls that make it so powerful
- Mix: Create parallel compression without needing a second bus. Compress everything hard, then blend the mix back. This is, in my opinion, the single most useful control in this plugin and one most producers and engineers never even touch.
- Distortion: This adds harmonic saturation to a compressed signal, in soft, hard and clip modes. Soft and hard on a vocal adds extra density, Clip on a drum bus adds extra aggression.
- Side chain with filters: Filter what the compressor listens to without filtering what you hear. The drum bus high-pass above is a strong use here, but side-chaining a pad against your kick is also possible.
- Auto Release: This is a program-dependent release time feature. On material with changing density, it usually beats a fixed value.
- Limiter: A built-in output limiter so a single instance can both compress and catch peaks if necessary.
- Knee: Use hard knee for more control and strong compression effect, and soft for more transparency. Almost nobody adjusts this but it changes the compressor's character more than any ratio does.
When to actually buy a third-party compressor?
Buy a third-party compressor when you hit a feature Logic's Compressor does not have, not just when you want a fancier plugin design on your screen.
After using the Logic Stock Compressor into my workflow for years now, I've discovered the following limitations:
- Multiband compression: For when you need to compress one frequency range independently. Logic's Multipressor is workable but very limited next to award-winning plugins such as FabFilter Pro-MB.
- Detailed metering and visual feedback: Plugins like FabFilter Pro-C 2 show you what is happening in a way that shortens the learning curve of a compressor considerably. However, I personally like the fact that the stock compressor forces you to rely on your ears rather than your eyes.
- Upward Compression: Standard compressors push loud peaks down (downward compression), but sometimes you need to pull quiet details up without crushing the transients, and Logic does not have a dedicated upward compressor, only parallel compression options. If you need to aggressively raise noise floor, room ambience, or vocal breath details, you will probably resort to third-party tool like Xfer OTT or Waves MV2.
What I'd consider not a reason to buy: wanting an 1176, an LA-2A, a dbx 160 or an SSL bus compressor, because a TikTok told you so. You already have all four within Logic Pro.