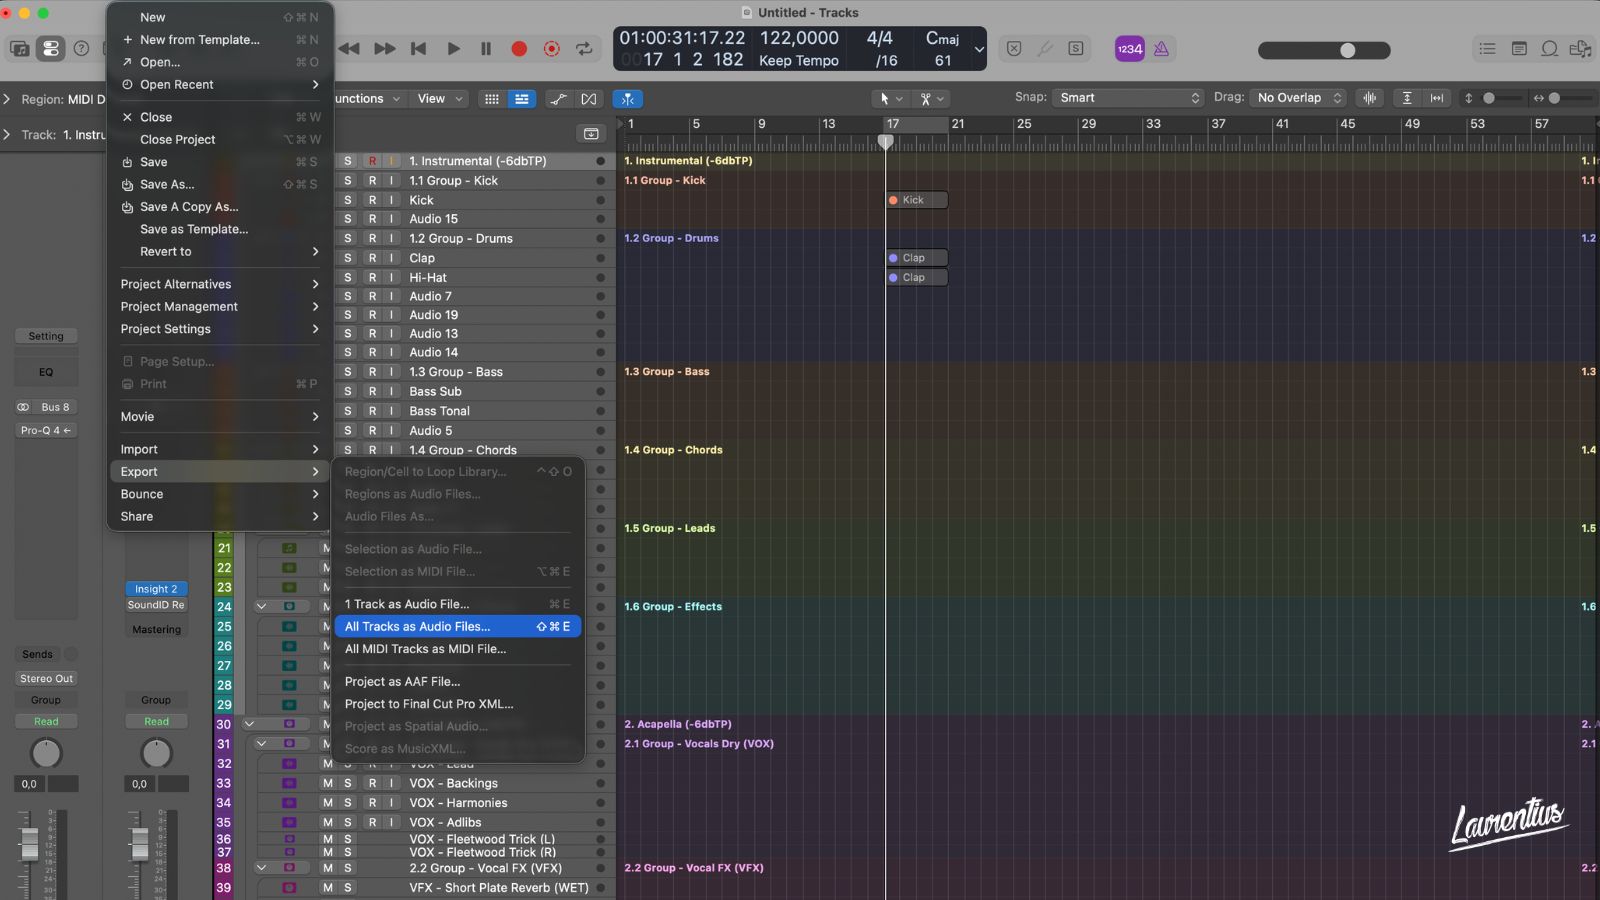
Deliver two folders, as separate stems and grouped stems, every file exported from bar one to the end of the track, 24-bit WAV at the project sample rate, no heavy processing on the master bus, tracks organised and named consistently, all inside a main folder that is named with the tempo, the key, the date of export and the song ID. That is the pro-standard for delivering stems.
So, you signed your first song to a label. Congratulations, that is genuinely hard and most producers never get there! Then the email arrives: "can you send stems for the mixing and mastering engineer?". Suddenly you are looking at your project file and you have no idea what they actually want.
Here is how it is done. This is the way I prepare every stems delivery for major labels including Sony, Universal, Soave and LoudKult, and it is the way I ask for them when someone books me. Here's more about my background if you want to get to know my work!
Contents
- What a label actually means by "stems"
- The folder structure
- Naming, and why it saves you a revision round
- The eight rules that make a stem set usable
- Why you send both grouped and separate
- Exporting stems in Logic Pro
- Exporting stems in FL Studio
- Exporting stems in Ableton Live
- Ready to deliver stems like the professionals?
- Frequently asked questions
What a label actually means by "stems"
A stem is a pre-mixed audio file that is exported from your music project. It can be a single audio file, like a file with only the clap in your song playing, but can also be grouped: all the drums together, all the vocals together, or all the guitars together. When music professionals ask for stems, they are asking for your demo exported into every element solo-ed, which are the parts an engineer might need to mix & master your song.
Cass Irvine (Wired Masters & STMPD RCRDS) describes a simple stem master grouped into "a kick, percussion, bass, synths, vocals and effects". That is a good starting point. The reason it exists at all is about more control. "With stereo mastering, if you want to bring up the vocals, there's not much you can do. It's an imperfect solution, really."
So, the engineer is not asking for your session. They are asking for a folder with audio-files that lets them change one thing without changing the whole mix at the same time.
The folder structure
Use one parent (main) folder. There should be two folders inside this parent folder. And the master demo you've made, and if you wish alongside a reference track.
| Folder | What goes in it | Why it is there |
|---|---|---|
| 01 - Grouped Stems | Kick, Drums, Bass, Synths, Keys, Guitars, Lead Vocal, Backing Vocals, FX | What the engineer actually works from |
| 02 - Separate Stems | Every channel individually, in the same time base | What they reach for when one element inside a group is the problem |
| Demo bounce | Your own master, plus a reference track if you have one | Tells the engineer what you were aiming at |
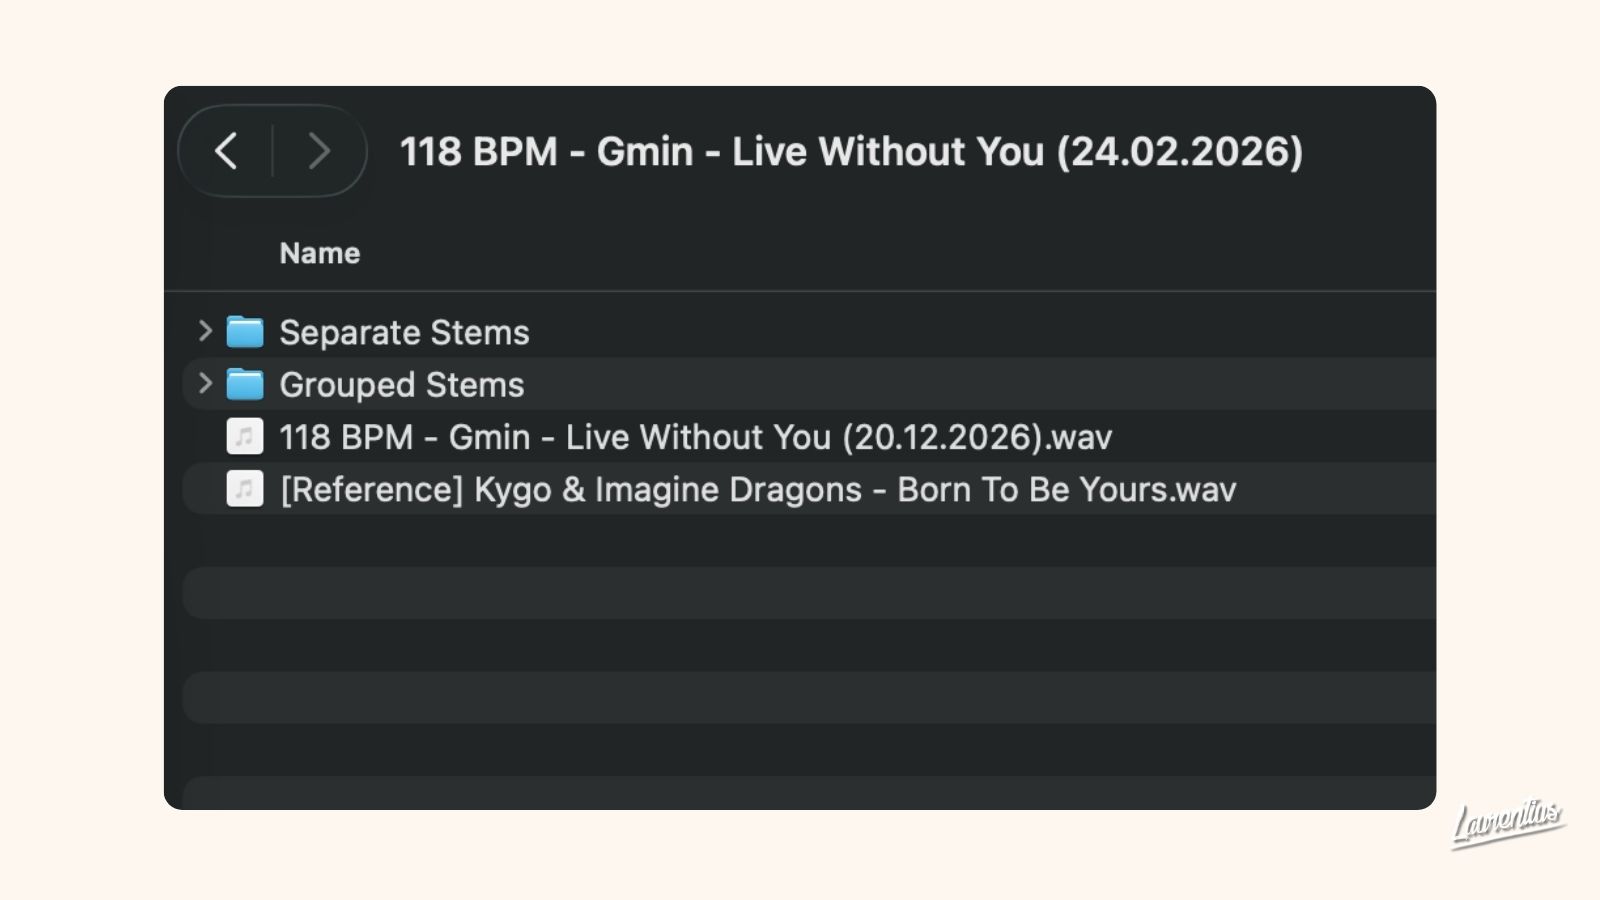
The parent folder should be named according to the following structure:
120 BPM - G maj - Song ID - Date
Tempo, key, song ID (title), date of export. You can also name your demo according to this exact format.
Your engineer can now set their session tempo, pitch a reference, and file the job without needing to find out themselves or asking you. Important: If your label uses its own catalogue numbers, use theirs.
Below is an example of how to set up the parent folder for my release, Live Without You:
Naming, and why it saves you a revision round
Number so it sorts in the order the mix needs to be built, not alphabetically. Here's an example:
01 Kick.wav02 Sub.wav03 Clap.wav04 Percussion.wav05 Bass.wav06 Chords.wav07 Lead.wav08 Lead Vox.wav09 BV Stack.wav10 FX.wav
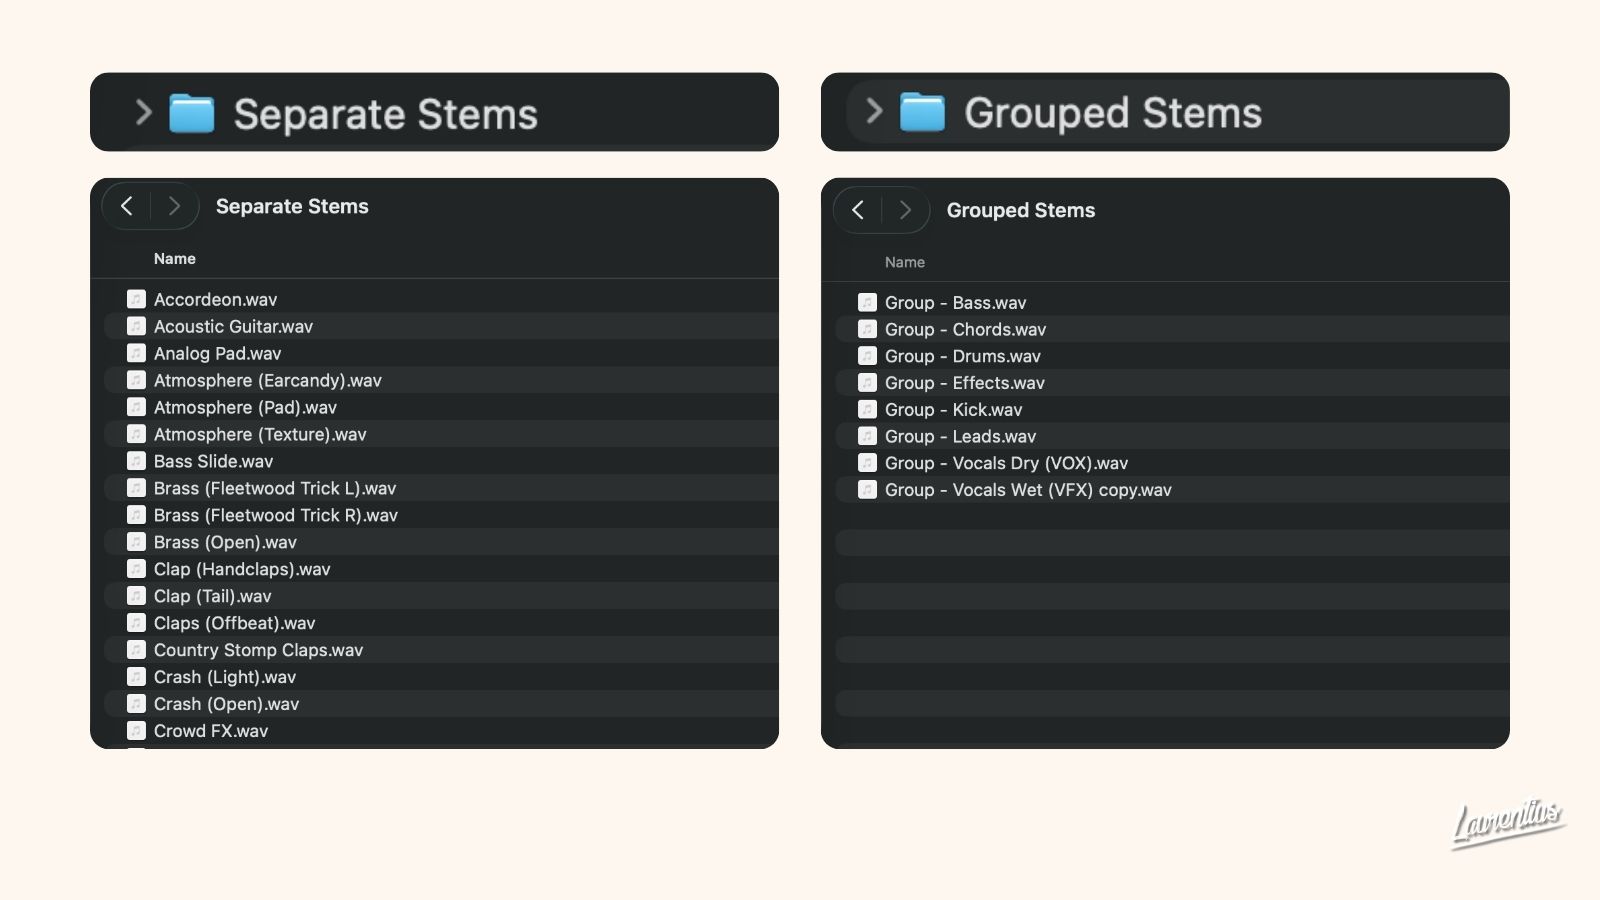
Two rules that matter more than they look. Never send a file called "Audio 07.wav", and never send two files whose names differ only by a number you assigned in a hurry. Personally, I name my audiofiles and groups clearly, which works fine as well.
Below is an example of how to set up my separate stems folder (left) and grouped stems (right) for my release, Live Without You:
 The eight rules that make a stem folder usable
- Every file starts at bar one and ends at the same point. Drag all of them into a fresh session at 00:00:00 and the record should reassemble exactly. This is the rule that breaks most amateur deliveries.
- Remove everything from your (master) bus before you export. A limiter, a clipper, a compressor, a monitoring correction. If you do choose to use some glue compression, say so in a note.
- 24-bit WAV at the project sample rate. Do not convert anything. If you recorded at 48 kHz, deliver in 48 kHz. Resampling is the engineer's decision, not yours. Also never send MP3 files, as these are compromised audio-files.
- No normalisation. It destroys the relative balance between stems, which is the entire point of sending them.
- Leave headroom. No stem should be clipping and the sum should not be either. Pull the fader down before you export, so the peaks land at around -6 dB at most.
- No fades on the individual files. Fades belong on the master.
- Include the tails. Let reverbs and delays play out completely rather than cutting at the last bar of the song.
- Leave your automation in, do not bypass your plugins. Your automations and filter sweeps are part of your arrangement. The engineer needs them to keep your intended sounds.
Why you send both grouped and separate
Grouped stems are what gets worked on, separate stems are extra insurance. When the engineer finds that the hi-hat is what is making the drums harsh, they need the hi-hat, not the whole drum group stem. Sending both grouped and individuals costs the same amount of time and removes an entire round of emails with your engineer.
Exporting stems in Logic Pro
Apple's documented path is File > Export > All Tracks as Audio Files.
- Set the cycle region to cover the whole arrangement, from bar one past the last tail.
- Choose your Save Format and Bit Depth in the dialog. WAV, 24-bit.
- Leave Bypass Effect Plug-ins unchecked. You want the channel processing printed.
- Check Include Audio Tail so instrument releases and effect tails are captured.
- Check Include Volume/Pan Automation. Apple's own guidance notes that exporting without volume and pan automation is generally preferable when files go to another app, but for a mix delivery your rides are musical decisions and should travel with the audio.
- Set Normalize to Off.
- Use the filename Pattern field to build consistent names rather than renaming afterwards.
To create grouped stems, route your audio-tracks to designated busses, and you export both during the same export.
Exporting stems in FL Studio
File > Export > Wave file, then in the render window enable Split mixer tracks. FL Studio creates one file per mixer track.
- Set the song range to the full arrangement before you render.
- Enable Split mixer tracks.
- Image-Line's own note on this option: selecting Enable master effects will include the master mixer track effects on the split files. For a stem delivery you normally want that off, so the engineer receives the stems without your master chain baked in.
- Set depth to 24-bit and leave normalisation off.
- Name your mixer tracks before rendering. FL uses the mixer track names in the filenames, so five minutes of naming in the mixer is the whole naming job done.
Exporting stems in Ableton Live
Cmd + Shift + R on Mac, Ctrl + Shift + R on Windows, to open Export Audio/Video. Ableton's own documentation for stem export is specific:
- Set Rendered Track to All Individual Tracks.
- Make sure Render Start and Render Length span the entire arrangement.
- Disable Render as Loop, Convert to Mono and Normalize.
- Enable Encode PCM and choose WAV.
- Ableton recommend rendering at 32-bit to avoid double dithering, and leaving dithering to the mix engineer. If your engineer has asked for 24-bit, give them 24-bit; otherwise follow Ableton here.
- On Live 10.1 and later, use Include return and master effects if your sends are part of the sound.
One point worth checking, in Ableton's own words: "Any grouped tracks will be rendered at the group level with group effects intact, and each individual grouped track will also be exported, without group effects." Group your session properly and Ableton produces your grouped set and your separate set in a single render.
Ready to deliver stems like the professionals?
Now you have everything you need to deliver stems professionally and keep your engineer happy. Good luck with your release, and send me your demos to play in my live DJ sets.
If you would rather hand the whole thing over than prepare it twice, mixing and mastering are two of the things I do from my music studio in Zwolle. The full list, including production, songwriting and topline work, is on my services page.
If you are now getting label interest and your productions need to sound with a professional standard before they are sent, that is what hiring a producer is for, including ghost production where the record needs to exist under your name.
Send me your folder and a reference. Start here, or hear my work in releases.